 written by Hart Hoover at Rackspace
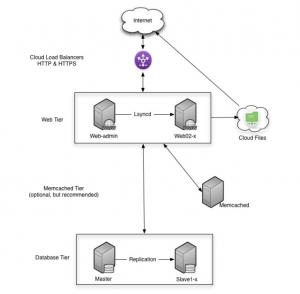
Our customers come to us with all kinds of applications, from CMSs like Drupal and Joomla to eCommerce applications like Magento and everything in between. I’d like to discuss one of the most popular applications we encounter, WordPress, and how the Managed Cloud team recommends deploying it at Rackspace. The end result is a WordPress site that uses Cloud Load Balancers, Cloud Servers, and Cloud Files to deliver an easily scalable, modular configuration.
For the purpose of this post, we will assume you have a domain for the site, the Cloud Servers will be CentOS 5 LAMP images with a Managed Service Level, and the web servers are configured with Postfix and SendGrid.
Step One: Provision the servers
The first thing you need to do is build your cloud environment. We recommend you build the following configuration:
- Web Servers – web-admin and web2
- MySQL Database Servers
- Memcached Server (optional – see Appendix 1)
- HTTP Cloud Load Balancer – balancing web-admin and web2
- HTTPS Cloud Load Balancer – only sending traffic to web-admin. (Shared VIP with the HTTP balancer)
- Cloud Files container using the CDN
Cloud Servers is meant for tiers of servers that can scale outward horizontally, and this configuration is meant for just that. The first thing to do on each server is disable applications you won’t need, for example, MySQL on the web nodes and Apache on the MySQL nodes. DNS for the domain points to the shared load balancer IP address.
Step Two: Configure the web nodes
First add an Apache virtual host to each web node – this tells Apache to serve requests for your domain to your WordPress directory. Once this is complete, set up a package called lsyncd on web-admin. This package pushes content using rsync to other servers over the service network when changes are made to the content. More information on lsyncd is available here: http://code.google.com/p/lsyncd/
Then, disable mod_php and instead install suPHP – a module for Apache that runs PHP scripts as the user that owns the file, instead of the “apache” user. We use this so customers can easily upgrade WordPress and install plugins directly from the WordPress admin dashboard. It’s a bit less complicated than using PHP-FPM and suexec, which makes it easier to manage. At this time, also install the memcache PHP module and set it to save sessions in memcached on your database nodes.
Step Three: Configure the database servers
Add a database for WordPress and configure the MySQL nodes with Master/Slave replication. Also disable the Holland backup process (http://hollandbackup.org) on the master server, leaving it enabled on the slave server. Next, install Rackspace Hosting – memcached on the database nodes and allow connections via IPTables from the web nodes. We normally start memcached with two bins, one for caching WordPress content, the other for PHP sessions. If you have elected to use a memcached server you should use that for this purpose.
Step Four: Install WordPress
Install WordPress on web-admin only – lsyncd will copy the content over to web2 for you. Set WordPress to use SSL for admin sessions (using FORCE_SSL_ADMIN=‘true’ in the wp-config.php file). This means that when a user logs into the admin dashboard they will be on the web-admin server. This makes the web-admin server our “master instance” that will push any and all updates to the rest of our web tier.
At this point the configuration is basically ready to use, but we still need a few plugins to maximize the configuration.
Step Five: Install WordPress Plugins
The plugins that we recommend you install are:
• W3 Total Cache
• HyperDB
W3 Total Cache allows you to use Cloud Files for static content that is served via the Akamai CDN, as well as use memcached on your database nodes for caching.
HyperDB allows WordPress to work with the MySQL Master/Slave replication we set up earlier. It will send database writes to the master and read from the slave(s). It also supports multiple masters in the event the customer needs to scale quickly.
That’s it!
WordPress is now set up in a multiple-server, multiple-tier, easily scalable and modular cloud server configuration. WordPress is also using three Rackspace Cloud products – Servers, Files, and Load Balancers.
Scaling the configuration
Let’s say your site is getting really busy, and this configuration isn’t cutting it anymore. You can scale in two ways, scaling upward (adding more RAM to each instance) or scaling outward (adding more instances on each tier). The web tier, memcached tier, and database tier are all scalable. To scale the web tier, you just need to take an image of web2 and create a new server based on that image, add it to the lsyncd configuration and the load balancer. To scale out the database tier, you can add a master or a slave and add it to the HyperDB configuration. Scaling in this fashion only takes a few minutes. Remember, if you are expecting a surge in traffic, it is ALWAYS better to over-provision servers and turn them off if you do not need them.
Notes on a Memcached server:
Having a separate memcached node helps with making the configuration more modular and doesn’t need to be huge (a 512M would do). You can definitely run memcached on the database nodes, but that leaves less memory for MySQL to use. You mileage may vary depending on how busy your site is and how much database power you require.
Find more information on memcached here: http://memcached.org
Check out the diagram below.


